Project: Hollow Rectangle with 8086 Assembly
Project: Hollow Rectangle with 8086 Assembly
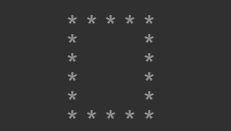
Our goal is to display output like the picture above.
Hmmm… before jumping into assembly code, lets think the logic behind it. As we know, they would print the display per row. And to make optimize code, we should examine how to make it compact with looping.
Guiding Question:
- How many stars in one row?
There’s 5 stars in the beginning and at the end. 2 stars in the middle, one in the first column and the other in the last column. - How many rows in total?
There’s 6 rows in total. - What different for each row?
There’s row with full of stars and the other only have 2 stars.
Coding Structure:
- Initialisation
- Interrupt for character print
- Store the value of * (HEX: 0x20)
- Store the value of space (HEX: 0x20)
- Store value for bits length for each row
1
2
3
4
5
start:
mov ah, 0x13
mov bh, 0x20
mov bl, 0x2a
mov cx, 9
- Loop 1:
Print full stars row. There’re 5 stars in the row, so make counter loop equal to 5 with (star)(space) and the last (star)(space) should be used in the next row. (looping start from 0)1 2 3 4 5 6 7 8 9
first: cmp al, 5 je second mov byte ds[bp], bl inc bp mov byte ds[bp], bh inc bp inc al jmp first
- Loop 2:
Set back the counter loop to 0. Because we already have (star)(space), we need 6 more (space) before adding the last (star) in the row.1 2 3 4 5 6 7 8 9
second: mov al, 0 third: cmp al, 6 je forth mov byte ds[bp], bh inc bp inc al jmp third
- Loop 3:
Print the last star in the row and set back the counter loop to 0.1 2 3
forth: mov byte ds[bp], bl mov al, 0
- Loop 4:
Last part is for displying the output. We need to display the row we’ve just created. Set the base pointer to 0 for the first row and increment it for the next row. For the other row, set the base pointer to 8 until 1 loop before last row. If looping equal to 6, stop the execition.1 2 3 4 5 6 7 8 9 10 11 12 13 14 15
fifth: mov bp, 0 int 0x10 inc al cmp al, 6 je stop sixth: mov bp, 8 int 0x10 inc al cmp al, 5 je fifth jmp sixth stop: hlt
Futher Explanation:
Did you realize something?
.
.
.
.
.
.
.
.
.
Did ya~?
.
.
.
.
.
.
.
So, in the first and the second looping, we fill the memory with the pattern (2 types: full stars and begin-last star).
Memory
| 0 | 1 | 2 | 3 | 4 | 5 | 6 | 7 | 8 | 9 | 10 | 11 | 12 | 13 | 14 | 15 | 16 |
| 2a | 20 | 2a | 20 | 2a | 20 | 2a | 20 | 2a | 20 | 20 | 20 | 20 | 20 | 20 | 20 | 2a |
0 until 8 are use for full stars row. (9 bits)
8 until 16 are use for the begin-last star row (9 bits)
We already set the bits lenght in the beginning (CX = 9). It means output display will be only display 9 bits. Then rules the loop to produce the desired pattern.
This post is licensed under CC BY 4.0 by the author.